• When you click on links to various merchants on this site and make a purchase, this can result in this site earning a commission. Affiliate programs and affiliations include, but are not limited to, the eBay Partner Network.

The Oregon Trunk Pan Project

BBillyC

Well-Known Member
Joined
Mar 2, 2009
Messages
460
Reaction score
3
Location
Winnipeg, Canada
I'm with you Collin. I thought mine was done for a while but I just had to look under that patch in the trunk. Hopefully in a couple of weeks all will be done, including a narrowed suspension. When you did your trunk pan how did you manage the old piece of flooring under the trunk lock and tail panel supports. The old floor is pretty rusty in spots right up to the panel so I am removing it but is sure is tough to get at. I am thinking of using a small disc cutter to cut up along the edge of the panel to be able to treat the frame to some picklex and galv weld paint. Just curious as how you managed that area. Thanks Bill
 

Basketcase

Keeper of the Green
Joined
Sep 10, 2008
Messages
14,415
Reaction score
299
'nuther reason I'm not in that big of a hurry to get my 1/4s on.(lack of $ helps too) probably gonna open up my own can of worms.
 

V269

Well-Known Member
Joined
Jul 7, 2009
Messages
1,156
Reaction score
2
Location
Ontario, Canada
BBillyC said:
I'm with you Collin. I thought mine was done for a while but I just had to look under that patch in the trunk. Hopefully in a couple of weeks all will be done, including a narrowed suspension. When you did your trunk pan how did you manage the old piece of flooring under the trunk lock and tail panel supports. The old floor is pretty rusty in spots right up to the panel so I am removing it but is sure is tough to get at. I am thinking of using a small disc cutter to cut up along the edge of the panel to be able to treat the frame to some picklex and galv weld paint. Just curious as how you managed that area. Thanks Bill

I did this part to mine as well. Drill out the spot weld's and get the trunk pan out from under the latch assembly. Use what ever is easiest, I used an air chisel for some of it. You will have to also drill out the weld's along the outside of the tail panel across the back to free up the floor. Then put the floor in and reweld the latch back down to it and the tail panel. Hope this help's. :cheers:
 

joewhite440

Well-Known Member
Joined
Nov 19, 2009
Messages
533
Reaction score
3
Location
Industry, Pa
My car has all new AMD stuff including. Wheel Housings. But the 1/4s were off when it went in. I have put the 1/2floors in my yellow 69 and my Youngest son's Superbee. They are nice pieces and do a nice job. Just be patient and do not get in a hurry. Drill all spot weld and make sure the panel pops lose. Do not pry anything. Makes a nice Job. And I agree it is a great time to minitub it now.
 

Collin

Well-Known Member
Joined
Jul 17, 2009
Messages
876
Reaction score
5
BBillyC said:
I'm with you Collin. I thought mine was done for a while but I just had to look under that patch in the trunk. Hopefully in a couple of weeks all will be done, including a narrowed suspension. When you did your trunk pan how did you manage the old piece of flooring under the trunk lock and tail panel supports. The old floor is pretty rusty in spots right up to the panel so I am removing it but is sure is tough to get at. I am thinking of using a small disc cutter to cut up along the edge of the panel to be able to treat the frame to some picklex and galv weld paint. Just curious as how you managed that area. Thanks Bill
I did just like you with using a spot weld cutter to get in there and get all the old panels out. I then cut the spot welds for the trunk lock and tail supports and carefully bent them up out of the way. After laying in the new trunk panels I spot welded them into the frame rails and actually just spot welded it in across the back edge. I am just going to fill that seam with seam sealer like they did from the factory. I also had to replace my rear bumper support as well because of how rusted up everything was. Pictures show how my trunk looks now..some quick primer...no bondo yet and no finishing touches so very rough finish, but not bad to work with now!! hope it helps!
 

joewhite440

Well-Known Member
Joined
Nov 19, 2009
Messages
533
Reaction score
3
Location
Industry, Pa
Collin said:
BBillyC said:
I'm with you Collin. I thought mine was done for a while but I just had to look under that patch in the trunk. Hopefully in a couple of weeks all will be done, including a narrowed suspension. When you did your trunk pan how did you manage the old piece of flooring under the trunk lock and tail panel supports. The old floor is pretty rusty in spots right up to the panel so I am removing it but is sure is tough to get at. I am thinking of using a small disc cutter to cut up along the edge of the panel to be able to treat the frame to some picklex and galv weld paint. Just curious as how you managed that area. Thanks Bill
I did just like you with using a spot weld cutter to get in there and get all the old panels out. I then cut the spot welds for the trunk lock and tail supports and carefully bent them up out of the way. After laying in the new trunk panels I spot welded them into the frame rails and actually just spot welded it in across the back edge. I am just going to fill that seam with seam sealer like they did from the factory. I also had to replace my rear bumper support as well because of how rusted up everything was. Pictures show how my trunk looks now..some quick primer...no bondo yet and no finishing touches so very rough finish, but not bad to work with now!! hope it helps!


Very nice work!!!

Good job and advise.
 

ArcDevilz

Well-Known Member
Joined
Apr 4, 2010
Messages
78
Reaction score
1
So glad they make parts for these cars. Too bad my 71 Buick has zero aftermarket stuff. I am tempted to buy a second car to restore it. It has a few issues with rust at the rear passenger floor pans and also the trunk. Cars are like a black hole for money. They just suck it up.
Good luck and post up some pics.
 

Collin

Well-Known Member
Joined
Jul 17, 2009
Messages
876
Reaction score
5
Thanks guys...the support is much needed! Sometimes this car feels like its taking forever!! Working 24 hour shifts and buying a condo (should be closing in a month, dont worry it has a biiig garage) takes up a lot of time and $. But everyday I chip away at it. Yesterday was grinding the welds on the inner fenders and frame rail cap, today was removing the bushings from the upper control arms and ordering new ones along with new ball joints! Just as long as I keep the ball rolling things should be good!! I will hafta take pictures of the bottom of my car and show you guys how it looks all undercoated up, very nice!!!
 

moparstuart

Well-Known Member
Joined
Feb 27, 2009
Messages
6,627
Reaction score
7
Location
overland park ks / odessa missouri
Collin said:
Thanks guys...the support is much needed! Sometimes this car feels like its taking forever!! Working 24 hour shifts and buying a condo (should be closing in a month, dont worry it has a biiig garage) takes up a lot of time and $. But everyday I chip away at it. Yesterday was grinding the welds on the inner fenders and frame rail cap, today was removing the bushings from the upper control arms and ordering new ones along with new ball joints! Just as long as I keep the ball rolling things should be good!! I will hafta take pictures of the bottom of my car and show you guys how it looks all undercoated up, very nice!!!
pictures yes :jester: :jester:
 

Basketcase

Keeper of the Green
Joined
Sep 10, 2008
Messages
14,415
Reaction score
299
ArcDevilz said:
So glad they make parts for these cars. quote]


It hasn't always been like this. I'm only 46, and I can remember before Year One,AMD, and the internet, we were at the mercey of scrounging boneyards, hoping to find a door or fender better than the bondo filled piece of swiss cheese you already had. And floors? ever wonder why your new toy had a stop sign under the carpet? The new stuff might not be cheap, but it's far better than the way it used to be. A lot of good cars got parted because there was no other way.
 

V269

Well-Known Member
Joined
Jul 7, 2009
Messages
1,156
Reaction score
2
Location
Ontario, Canada
Basketcase said:
ArcDevilz said:
So glad they make parts for these cars. quote]


It hasn't always been like this. I'm only 46, and I can remember before Year One,AMD, and the internet, we were at the mercey of scrounging boneyards, hoping to find a door or fender better than the bondo filled piece of swiss cheese you already had. And floors? ever wonder why your new toy had a stop sign under the carpet? The new stuff might not be cheap, but it's far better than the way it used to be. A lot of good cars got parted because there was no other way.

You are so right. :yesnod: :yesnod: :yesnod:
 

BBillyC

Well-Known Member
Joined
Mar 2, 2009
Messages
460
Reaction score
3
Location
Winnipeg, Canada
More surprises. Dropped the rear end out and took it apart. I thought it was a peg leg, but it was sold to me as being a posi with 3.91 gears. Duh....well it turns out to be an open differential with 3.23 gears. :brickwall: :brickwall: :brickwall: Gotta go find a 3.91 pinion and crown.

Anyway I have the car up on jack stands, trunk pan out, rear-end disassembled, and now waiting for the new tin. The frame is rust free inside but will treat it anyway. The springs look not so bad but I will get them checked.

Beginning to prep for the mini tub and will probably cut the inner wheel houses on Tuesday. I will be narrowing the rear suspension but noticed that the main frame rail which I will attach the new shackle to is 2 inches lower than the standard mount. I will have to mount the hole in the frame 2" lower which will probably offset the pinion angle which I will have to adjust for. Any thoughts.
 

BBillyC

Well-Known Member
Joined
Mar 2, 2009
Messages
460
Reaction score
3
Location
Winnipeg, Canada
Have most of the pan welded in along with the mini-tubbing nearing completion. need to prime it and seam seal where necessary. When all welded up I will submit some pics.
 

BBillyC

Well-Known Member
Joined
Mar 2, 2009
Messages
460
Reaction score
3
Location
Winnipeg, Canada
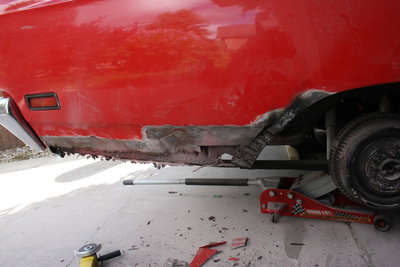
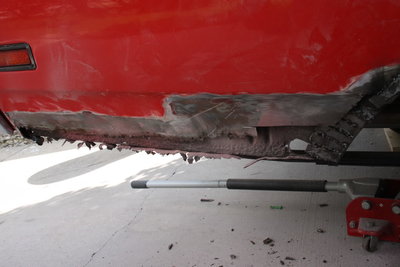
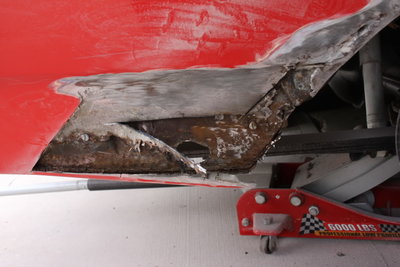
So my wife says to me "honey, there's a small chip in the paint on the rear quarter panel just behind the wheel. I go look at it and say "a little sand paper and paint and I'll be done in 20 minutes. She says I'll go make coffee. Cool. I start sanding and AAAAAAK!!!! Here is what I find. The fiberglass and bondo were 3/4" thick what a %$*^%ing mess. So we continue. I've ordered quarter panel patches for both sides because the other will be exactly the same. It is now official, there won't be a square inch of the car I haven't touched.

IMG_2730.jpg
IMG_2727.jpg
IMG_2729.jpg
 

BBillyC

Well-Known Member
Joined
Mar 2, 2009
Messages
460
Reaction score
3
Location
Winnipeg, Canada
The bad news as this car was sold to me by the dumb ass in Oregon who told me that it just recently had new quarters put on it. I love Oregon, beautiful place to bad it has a bald faced liar living there.
 

george68hemirr

I think you guys are full of shit.
Joined
Jan 23, 2009
Messages
12,645
Reaction score
68
Location
hudson valley ny
BBillyC said:
The bad news as this car was sold to me by the dumb ass in Oregon who told me that it just recently had new quarters put on it. I love Oregon, beautiful place to bad it has a bald faced liar living there.
sounds like theres a refund coming to you and a ass whiping for him :toetap:
 

BBillyC

Well-Known Member
Joined
Mar 2, 2009
Messages
460
Reaction score
3
Location
Winnipeg, Canada
He disappeared off the planet once the sale was made including phone number change. The prick even gave the wrong information to Canadian Customs when I tried to bring it across the border and it damn near got me arrested. When I tried calling him he wouldn't respond. If I lived in the states there probably would be a way to get this guy back legally but living in canada makes it way to hard. Moral of the story is Caveat Emptor...let the buyer beware,...that would be me. I guess I'm the dumb ass. anyway after doing all of the work I've had to do the car is beginning to look really great but I've pumped in more than 20K into it since the purchase and that is doing absolutely all of the work myself. I'll never recover the investment, but who cares....I have a red RR and RED RULES[/size]
 

george68hemirr

I think you guys are full of shit.
Joined
Jan 23, 2009
Messages
12,645
Reaction score
68
Location
hudson valley ny
just as long as your happy with your roadrunner thats the main thing.....it doesnt matter how much money you pour into it.....you know what you have and US RED GUYS HAVE TO STICK TOGETHER........RED RULES!!!!!!!!!!!!! :thumbsup: :thumbsup: :thumbsup:
 
Back
Top