• When you click on links to various merchants on this site and make a purchase, this can result in this site earning a commission. Affiliate programs and affiliations include, but are not limited to, the eBay Partner Network.

Bringing it back to factory specs!

resq302

Well-Known Member
Joined
Jul 9, 2013
Messages
280
Reaction score
5
Location
northern nj
Update....... LOTS of progress today! The rear axle is back together and we are so very close to driving it again. The only thing holding us back right now is that we have to bleed the air out of the rear brakes.

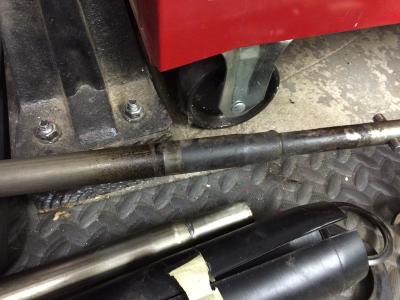
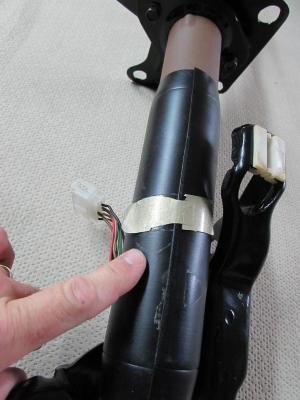
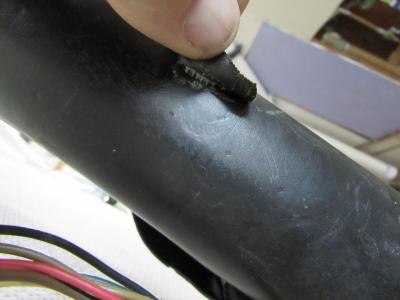
After carefully looking at the pics we determined that the yellow word appears to have said "tape" and a long with the blue word on the driver side axle tube "ebrake" I can only assume that they needed tape down the e-brake cables since the pass side is pretty long and gets bolted up to the underside of the body. If that was left dangling during shipment, it could have gotten snagged on something or damaged, hence the need to tape them up. Again, just a theory but that is what we deduced the original pictures to say.

IMG_0810.jpg

IMG_0812.jpg

IMG_0815.jpg

IMG_0814.jpg

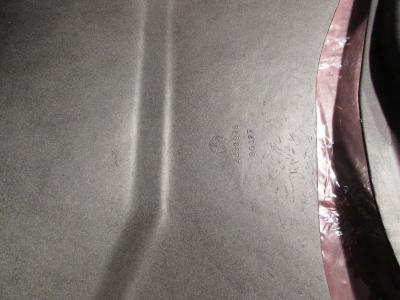
When I was cleaning the black paint off of the third member, I uncovered a yellow crayon marking of what looked to be a heart next to the 2 and a large hand written 4 on top of the third member. These were replicated with the paint crayon which I picked up from Quanta a few years ago.

IMG_0813.jpg

Yellow "heart" and 9-26 carrier assembly date code. (date code of 9 27 I am awaiting on the rubber stamp to come in for the axle tube final assembly date)

IMG_0816.jpg

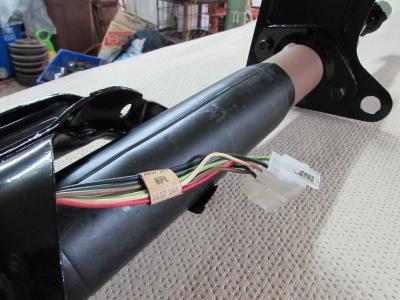
again, you can see how long the pass side e-brake cable is as it has to be attached to the rear axle housing.

IMG_0817.jpg

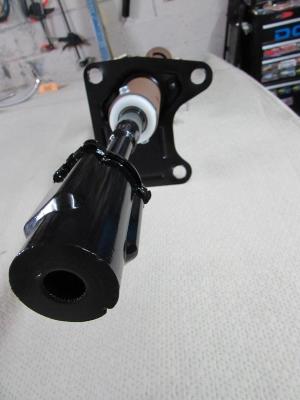
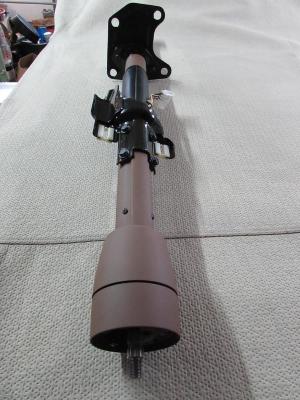
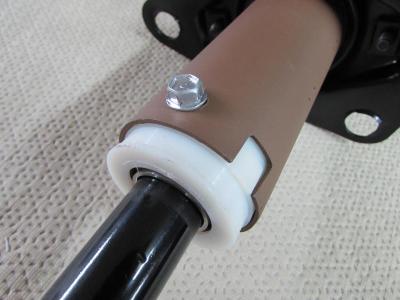
shocks installed and bolted up at the top mounting location. Waiting for the suspension to be compressed a little to attach the lower mounting points.

IMG_0818.jpg

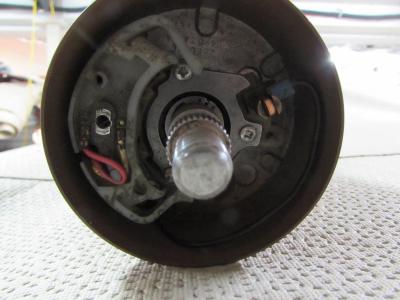
brake lines all installed. Note the new closed cell foam gasket where the wheel cylinder mounts to the backing plate.

IMG_0819.jpg

IMG_0820.jpg

IMG_0822.jpg

e-brake cables installed....

IMG_0821.jpg

wheels back on, e-brake lines connected to the main cable, shocks mounted to lower location, getting closer!

IMG_0823.jpg

IMG_0824.jpg

IMG_0825.jpg

IMG_0828.jpg

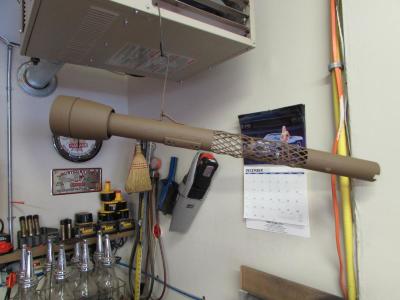
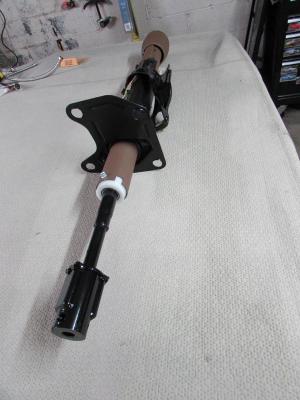
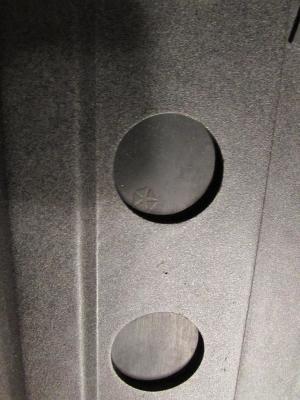
3 black stripes designate the 3.23 axle ratio with the large u joint and the orange dab denotes the use of Sure-Grip.

IMG_0827.jpg

IMG_0826.jpg

IMG_0829.jpg

IMG_0830.jpg
 

Big John

Sit back, relax Don't bitch about the cigar smoke
Joined
Sep 8, 2008
Messages
5,057
Reaction score
79
I read the hieroglyphics on the axle as "TAP IF E BRAKE"

I doubt if they would tape the emergency brake cable up for shipment and if they did, they wouldn't bother writing it on every car.

I think "TAP" is code or abbreviation for what needed to be done. Pretty normal to see some sort of shorthand used on the assembly line. I would bet it means "Take apart" or something like that. So.... Take apart if emergency brake...

If you go into any auto assembly line, next to the end of the line is a shop where the cars are pushed if they don't start or can't drive off the end of the line. They get diagnosed and some simple repairs are made. If it's a major rework, the car goes to another shop.

So... It would make perfect sense if the car had some issue with the brakes and someone is saying that it needs to be taken apart for repair.

This is some speculation on my part based on my personal experience in manufacturing and my experiences doing contract work in several auto plants.
 

resq302

Well-Known Member
Joined
Jul 9, 2013
Messages
280
Reaction score
5
Location
northern nj
So I was at Dad's today cleaning up the GTX from the rain we got caught in at the Mopars at E-town show. While cleaning out the stones and dirt on the brake pedal I decided to pull it off and low and behold I found this on the back side!

Front
CIMG2050.jpg

Back
CIMG2047.jpg

Back (close up)
CIMG2048.jpg

Looks like we have the original brake pad! Again, this brings to mind the question of whether it had 9,000+ miles or 109,000+ miles on it when we got it. With all of the original parts on this car, I'm still leaning towards this car being a 9,000+ mile car.
 

moparmonk

Well-Known Member
Joined
Dec 6, 2011
Messages
330
Reaction score
0
Location
Hermon, Maine
You have done some incredible investigating and documentation. Thanks for all your efforts. I had to stay late at work just to read all the posts. Keep up the great work.
 

resq302

Well-Known Member
Joined
Jul 9, 2013
Messages
280
Reaction score
5
Location
northern nj
Thank you Moparmonk! I must say though that the investigating has been extremely fun with words I really can't describe the feeling for. The only thing I can compare it to is what it must have felt like for Indiana Jones to find those treasured relics (if he were real). To find something that is this unmolested is a rarity. I wanted to do the car the best justice that I could with restoring it to what it left the assembly line and I think I did a decent job at it. I still have a few small things to do like clean up the steering column but for the most part.... the car is finished and now Dad can really beat the streets with it and enjoy it like he wants.
 

Basketcase

Keeper of the Green
Joined
Sep 10, 2008
Messages
14,415
Reaction score
299
I've never seen "mopar" used on anything before recent times. All the original parts from the '60s had the Pentastar, not mopar on them.
 

resq302

Well-Known Member
Joined
Jul 9, 2013
Messages
280
Reaction score
5
Location
northern nj
I beg to differ. Almost all of the parts I found which were originals such as the trans mount had the rounded M logo or the DCPC markings. Its all documented in the pics I've posted. Also, please note the date code on the brake pedal pad. I'm sure if I pulled the e-brake pedal pad off, I'd find the same thing there.
 

Basketcase

Keeper of the Green
Joined
Sep 10, 2008
Messages
14,415
Reaction score
299
not disagreeing, just in the years that I've been messing with these cars, I've never come across the mopar logo.
 

resq302

Well-Known Member
Joined
Jul 9, 2013
Messages
280
Reaction score
5
Location
northern nj
They seemed to go in cycles. DCPC, then the Mopar or rounded M logo, then the pentastar, then Chrysler, then back to the M logo as of late.
 

resq302

Well-Known Member
Joined
Jul 9, 2013
Messages
280
Reaction score
5
Location
northern nj
So, nearing the end of our restoration, I decided to tackle freshening up the steering column since we are now done with shows with this car till next year. Here are a couple pics of the steering column disassembled with a picture of the steering column shaft showing where the black paint (appeared to be gloss black) was sprayed till. The coupler was disassembled as the rubber seal was dried out from 45 years of age. A black rubber repro one was obtained and installed. Surprisingly, the bow tie shaped metal pieces inside the coupler showed almost no wear! Another nice thing is that the column showed zero evidence of ever being abused or in an accident as the plastic filled pins are still there and have never been collapsed.

Column all torn apart.

IMG_0131-1.jpg

evidence of gloss black paint applied by spray gun.

IMG_0132-1.jpg
 

Attachments

  • IMG_0131-1.jpg
    IMG_0131-1.jpg
    96 KB · Views: 0
  • IMG_0132-1.jpg
    IMG_0132-1.jpg
    106.9 KB · Views: 0

resq302

Well-Known Member
Joined
Jul 9, 2013
Messages
280
Reaction score
5
Location
northern nj
So the steel dash has been painted with the correct suede paint after the light surface rust was taken care of. While I had the paint mixed up, I painted the steering column as well. Tomorrow, reassembly of the steering column!

IMG_1188.jpg

IMG_1189.jpg

IMG_1191.jpg
 

Attachments

  • IMG_1191.jpg
    IMG_1191.jpg
    76.8 KB · Views: 0
  • IMG_1189.jpg
    IMG_1189.jpg
    91.5 KB · Views: 0
  • IMG_1188.jpg
    IMG_1188.jpg
    97.8 KB · Views: 0

resq302

Well-Known Member
Joined
Jul 9, 2013
Messages
280
Reaction score
5
Location
northern nj
Forgot to post the finished steering column pics. Its been done for almost a week now.

IMG_1200.jpg

IMG_1201.jpg

original turn signal harness with paper tag still attached!

IMG_1202.jpg

IMG_1203.jpg

IMG_1204.jpg

factory champagne colored tape that held the plastic cover together.

IMG_1205.jpg

same tape showing the black adhesive backing.

IMG_1206.jpg

original turn signal harness. Cancelling cam was popped off and old dried up grease cleaned out. Contacts cleaned up and new dielectric grease applied.

IMG_1207.jpg
 

Attachments

  • IMG_1200.jpg
    IMG_1200.jpg
    59.5 KB · Views: 0
  • IMG_1204.jpg
    IMG_1204.jpg
    39.4 KB · Views: 0
  • IMG_1205.jpg
    IMG_1205.jpg
    55.2 KB · Views: 0
  • IMG_1203.jpg
    IMG_1203.jpg
    76.1 KB · Views: 0
  • IMG_1202.jpg
    IMG_1202.jpg
    106.7 KB · Views: 0
  • IMG_1201.jpg
    IMG_1201.jpg
    71 KB · Views: 0
  • IMG_1206.jpg
    IMG_1206.jpg
    63 KB · Views: 0
  • IMG_1207.jpg
    IMG_1207.jpg
    78.8 KB · Views: 0

resq302

Well-Known Member
Joined
Jul 9, 2013
Messages
280
Reaction score
5
Location
northern nj
Since I forgot to take a picture of these before I went to work last night, here are some more pics of the emblems that I restored for Dad's GTX which goes on the front of the hood and on the hood scoop bezels for the air grabber system.

IMG_1235.jpg

IMG_1236.jpg
 

Attachments

  • IMG_1236.jpg
    IMG_1236.jpg
    76 KB · Views: 0
  • IMG_1235.jpg
    IMG_1235.jpg
    95.7 KB · Views: 0

resq302

Well-Known Member
Joined
Jul 9, 2013
Messages
280
Reaction score
5
Location
northern nj
So I got some more accomplished on Dad's GTX today. The hood stripes have always bothered me since we got the car. Mainly because it was not the correct finish. The stripes were originally something called "organisol" which was a textured low gloss black paint. I was able to get the same result with a similar paint and like the dash, I fogged on the last coat to give it that "textured" feel.

IMG_1241.jpg proud owner in the background!

IMG_1242.jpg

IMG_1244.jpg

Next week comes more reassembly now that the painting is totally finished! I gotta say, I can't wait to get his car back together and see the completed result. The car just keeps getting better and better and more and more correct the way the factory would have done it!
 

Attachments

  • IMG_1241.jpg
    IMG_1241.jpg
    103.4 KB · Views: 0
  • IMG_1242.jpg
    IMG_1242.jpg
    96 KB · Views: 0
  • IMG_1244.jpg
    IMG_1244.jpg
    70 KB · Views: 0

resq302

Well-Known Member
Joined
Jul 9, 2013
Messages
280
Reaction score
5
Location
northern nj
Hood scoops, engine size emblems, and air grabber screens all repainted and installed.

IMG_1249.jpg

IMG_1250.jpg

IMG_1251.jpg

IMG_1253.jpg
 

Attachments

  • IMG_1249.jpg
    IMG_1249.jpg
    117.9 KB · Views: 0
  • IMG_1250.jpg
    IMG_1250.jpg
    61.5 KB · Views: 0
  • IMG_1251.jpg
    IMG_1251.jpg
    109.7 KB · Views: 0
  • IMG_1253.jpg
    IMG_1253.jpg
    89.2 KB · Views: 0

resq302

Well-Known Member
Joined
Jul 9, 2013
Messages
280
Reaction score
5
Location
northern nj
So, today was supposed to be the day that we started putting the GTX back together with starting with the newly restored air grabber system that Dad got from Russ Jenkins of Restoration Full Circle. Unfortunately, we had a little hold up as Dad misplaced the gaskets to install under the hood scoops to the hood so until we find them or the replacement set comes in, these pics will have to do for now. If you have not seen Russ' work before, you will be absolutely amazed. These parts certainly deserve to be on the GTX as the amount of detail will blow your mind! To say that these are restored to OE or better is an understatement! Russ certainly out did himself as far as I am concerned. Truly amazing work. I'll let the pics show off these fine pieces. All factory original parts that are either restored or repaired. New rubber and foam seals are included. Correct plated hardware and brackets all down to the smallest detail! Way, way better than the warped, incorrect painted, have to drill your own mounting holes repro's that are out there.

IMG_1258.jpg

IMG_1261.jpg

IMG_1255.jpg

IMG_1259.jpg

IMG_1262.jpg

IMG_1260.jpg

IMG_1265.jpg

IMG_1266.jpg

As I said, correct down to the SMALLEST detail. Pentastar logo and part number on the rubber seal for the flapper door inside the fiberglass halves.

IMG_1264.jpg

IMG_1263.jpg

To say that this thing was protected in shipping is an understatement! Russ builds a crate for these pieces so they certainly do not have any chance of getting damaged. Even the bubble wrap inside the crate was beyond what I imagine could have fit inside the crate.

IMG_1267.jpg

IMG_1268.jpg

IMG_1269.jpg
 

Attachments

  • IMG_1258.jpg
    IMG_1258.jpg
    94 KB · Views: 0
  • IMG_1261.jpg
    IMG_1261.jpg
    90.3 KB · Views: 0
  • IMG_1259.jpg
    IMG_1259.jpg
    99.7 KB · Views: 0
  • IMG_1262.jpg
    IMG_1262.jpg
    50.7 KB · Views: 0
  • IMG_1255.jpg
    IMG_1255.jpg
    76 KB · Views: 0
  • IMG_1265.jpg
    IMG_1265.jpg
    102.3 KB · Views: 0
  • IMG_1266.jpg
    IMG_1266.jpg
    99.4 KB · Views: 0
  • IMG_1260.jpg
    IMG_1260.jpg
    155.6 KB · Views: 0
  • IMG_1269.jpg
    IMG_1269.jpg
    67.7 KB · Views: 0
  • IMG_1268.jpg
    IMG_1268.jpg
    44.2 KB · Views: 0
  • IMG_1267.jpg
    IMG_1267.jpg
    74.1 KB · Views: 0
  • IMG_1263.jpg
    IMG_1263.jpg
    113.3 KB · Views: 0
  • IMG_1264.jpg
    IMG_1264.jpg
    70.8 KB · Views: 0

resq302

Well-Known Member
Joined
Jul 9, 2013
Messages
280
Reaction score
5
Location
northern nj
Got some major work done yesterday. For those who have not installed an Air Grabber system, its not for the faint of heart! It requires a little finessing to get it into the proper spot without cracking or breaking anything. Pass side took me the longest and driver side went right in like I've done it a million times. Go figure. lol I just have the cable left to install under the dash and its complete. More progress hopefully on Monday!

Hoods scoops installed!

IMG_1276.jpg

IMG_1277.jpg

Air grabber system installed under the hood.

IMG_1279.jpg

Air cleaner parts installed.

IMG_1280.jpg

IMG_1281-1.jpg

IMG_1283.jpg
 

Attachments

  • IMG_1279.jpg
    IMG_1279.jpg
    111.8 KB · Views: 0
  • IMG_1280.jpg
    IMG_1280.jpg
    115.3 KB · Views: 0
  • IMG_1277.jpg
    IMG_1277.jpg
    67.6 KB · Views: 0
  • IMG_1276.jpg
    IMG_1276.jpg
    76.1 KB · Views: 0
  • IMG_1281-1.jpg
    IMG_1281-1.jpg
    48.8 KB · Views: 0
  • IMG_1283.jpg
    IMG_1283.jpg
    122.6 KB · Views: 0
Back
Top