• When you click on links to various merchants on this site and make a purchase, this can result in this site earning a commission. Affiliate programs and affiliations include, but are not limited to, the eBay Partner Network.

Bringing it back to factory specs!

resq302

Well-Known Member
Joined
Jul 9, 2013
Messages
280
Reaction score
5
Location
northern nj
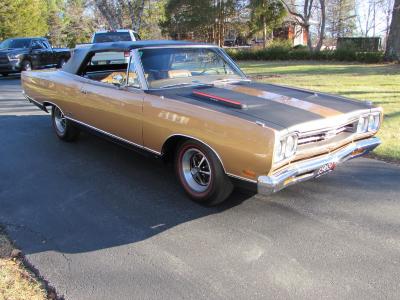
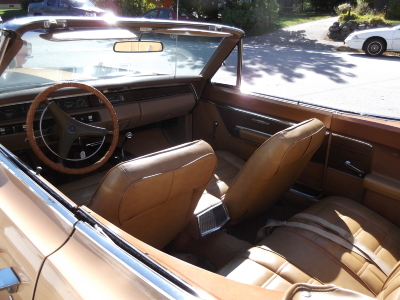
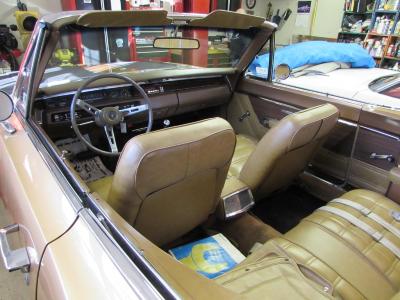
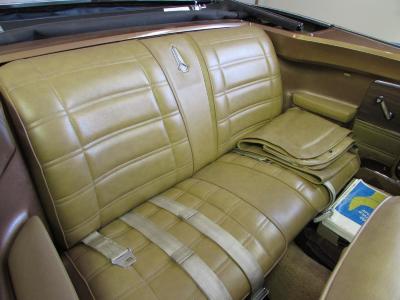
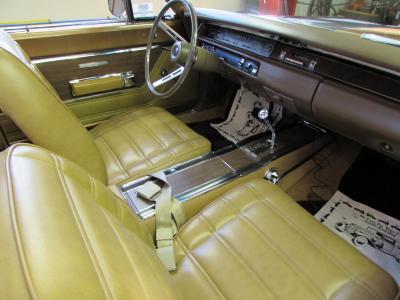
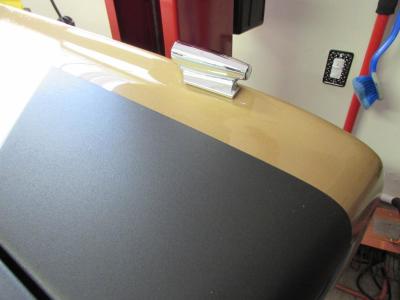
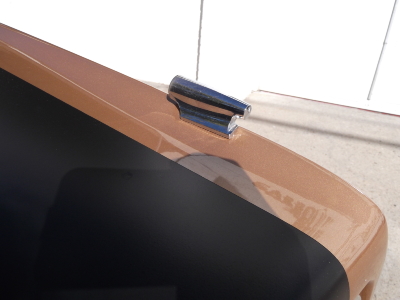
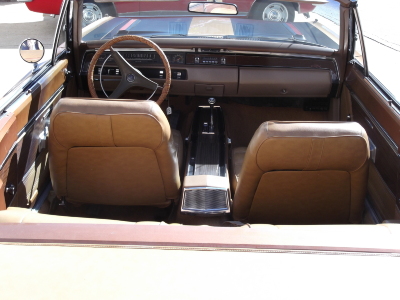
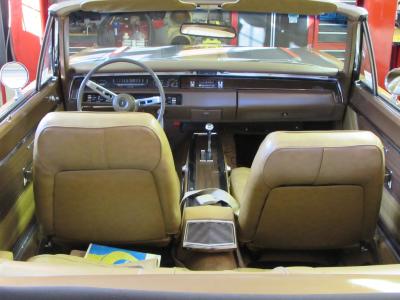
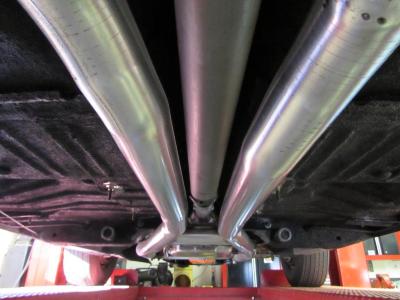
So lots of progress in the last couple of days. Windshield is back in with a new rubber gasket. This probably was the most stressful part of the resto for me. I was so worried that when I reinstalled the windshield, I was going to crack it. I'll do a separate thread on the entire windshield installation as this was my second one I have done. My charger being the first.

IMG_1292.jpg

IMG_1293.jpg

IMG_1294.jpg

IMG_1295.jpg

IMG_1300.jpg

IMG_1298.jpg

IMG_1301.jpg

IMG_1299.jpg

Tools used: (Key is to use a lot of windshield cleaner as a lubricant to slide the gasket over the glass.)
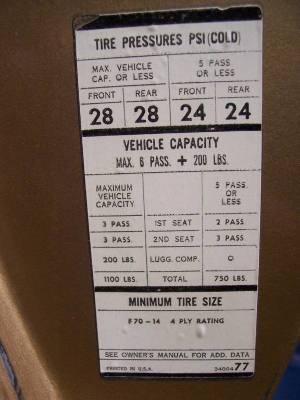
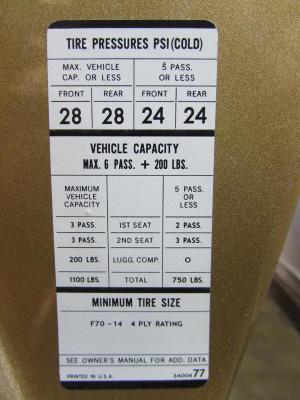
IMG_1296.jpg

IMG_1297.jpg

IMG_1292.jpg

IMG_1293.jpg

IMG_1294.jpg

IMG_1295.jpg

IMG_1300.jpg

IMG_1298.jpg

IMG_1301.jpg

IMG_1299.jpg

IMG_1296.jpg

IMG_1297.jpg
 

resq302

Well-Known Member
Joined
Jul 9, 2013
Messages
280
Reaction score
5
Location
northern nj
Since progress was going so well with getting the windshield back in, I figured it was time to get the steering column back in, too. I took the precaution of wrapping the steering shaft with some bubble wrap so as not to scratch up the freshly painted column. With the help of my father I fed the steering column through the firewall and guided it into the correct alignment of the steering box. For those who have not removed your steering column, there is one tooth that is wider than the rest which should be straight up to ensure the steering wheel is centered to the wheels on the steering box as well as where the steering wheel mounts up. There is also a notch on the steering shaft knuckle that helps you align the splines. After the splines were mated, the column was then bolted up to the underside of the dash and wiring was all connected. Steering column cover was then installed and the installation was completed.

IMG_1305.jpg

IMG_1306.jpg

IMG_1307.jpg

IMG_1311.jpg

IMG_1316.jpg

IMG_1305.jpg

IMG_1306.jpg

IMG_1307.jpg

IMG_1311.jpg

IMG_1316.jpg
 

resq302

Well-Known Member
Joined
Jul 9, 2013
Messages
280
Reaction score
5
Location
northern nj
Yesterday, I had a PM from someone who was working on doing a windshield for a similar sister car, a 69 Coronet convertible. He was inquiring how the trim came off and I realized I had forgotten to post those pics. Be aware that the convertible trim is different than the hard top trim pieces. I have to say between my charger and Dad's GTX vert, the trim on the charger was a LOT easier as it required less stuff to remove. On the convertibles, you first needs to drop the top to expose the 7 screws that hold the two piece top windshield / header trim. Once that is removed, you can then move on to the side A pillar trim. This needs to have the A post weather stripping removed to reveal the 4 screws that holds the stainless bracket in place that holds the weather stripping. Once that is off, you will find another set of 4 screws that holds the trim for the A pillar windshield trim. Now that the A pillar trim is off, you can remove the lower two piece windshield trim with the special trim removal hook / tool. Installation is in the reverse order taking time to install all of the screws loose till all of the screws are in. Then you can go back and tighten them snug.

Pictures are from when I was installing the trim. Removal would be in the reverse order.

lower windshield trim

IMG_1323.jpg

A pillar windshield trim installed, weather stripping stainless bracket being lined up.

IMG_1324.jpg

IMG_1325.jpg

IMG_1326.jpg

Header / upper windshield trim installed

IMG_1327.jpg

trim all installed

IMG_1328.jpg

completed project with wiper arms reinstalled

IMG_1329.jpg

IMG_1323.jpg

IMG_1324.jpg

IMG_1325.jpg

IMG_1326.jpg

IMG_1327.jpg

IMG_1328.jpg

IMG_1329.jpg
 

resq302

Well-Known Member
Joined
Jul 9, 2013
Messages
280
Reaction score
5
Location
northern nj
Thanks! Got the interior all back in tonight and pulled the two lower dash end caps for the steel dash frame so I can send them out to get the chrome plated plastic done. Can anyone recommend a good vacuum plater? I know CV Vacuum platers went out and they did all the work on my charger years ago.
 

resq302

Well-Known Member
Joined
Jul 9, 2013
Messages
280
Reaction score
5
Location
northern nj
Going through some pictures, I came across some oddities in the one inside A pillar plastic cover. It appears the mold was not completely cleaned out or some green plastic pellets were in the tan plastic mold. Check out the green swirls molded within the plastic. Seems they had excellent quality control in 1968 ! lol

IMG_1332.jpg

IMG_1331.jpg

IMG_1330.jpg
 

Attachments

  • IMG_1332.jpg
    IMG_1332.jpg
    72.9 KB · Views: 0
  • IMG_1330.jpg
    IMG_1330.jpg
    49.1 KB · Views: 0
  • IMG_1331.jpg
    IMG_1331.jpg
    73.7 KB · Views: 0

resq302

Well-Known Member
Joined
Jul 9, 2013
Messages
280
Reaction score
5
Location
northern nj
Well, well, well. Looks like ol' St. Nick stopped by my Dad's house a little early this year! Yup, here is the finished product (minus a few small detail items that he has to open for Christmas !

IMG_1495.jpg

IMG_1496.jpg

IMG_1497.jpg

IMG_1498.jpg

IMG_1500.jpg

IMG_1506.jpg

IMG_1509.jpg

IMG_1507.jpg

" unwrapped "

IMG_1505.jpg

IMG_1501.jpg

IMG_1503.jpg

IMG_1504.jpg

IMG_1495.jpg

IMG_1496.jpg

IMG_1497.jpg

IMG_1498.jpg

IMG_1500.jpg

IMG_1506.jpg

IMG_1509.jpg

IMG_1507.jpg

IMG_1505.jpg

IMG_1501.jpg

IMG_1503.jpg

IMG_1504.jpg
 

resq302

Well-Known Member
Joined
Jul 9, 2013
Messages
280
Reaction score
5
Location
northern nj
before :

14047502-770-0.jpg

after:

IMG_1505.jpg

before:

DSCF2413.jpg

after:

IMG_1511.jpg

before:

DSCF2412.jpg

after:

IMG_1512.jpg

before:

DSCF2411.jpg

after:

IMG_1513.jpg

before:

DSCF2410.jpg

after:

IMG_1514.jpg
 

Attachments

  • IMG_1505.jpg
    IMG_1505.jpg
    144.2 KB · Views: 0
  • 14047502-770-0.jpg
    14047502-770-0.jpg
    113.5 KB · Views: 0
  • DSCF2413.jpg
    DSCF2413.jpg
    620.1 KB · Views: 0
  • IMG_1511.jpg
    IMG_1511.jpg
    110.2 KB · Views: 0
  • DSCF2411.jpg
    DSCF2411.jpg
    138.5 KB · Views: 0
  • DSCF2412.jpg
    DSCF2412.jpg
    550.3 KB · Views: 0
  • IMG_1512.jpg
    IMG_1512.jpg
    88.5 KB · Views: 0
  • IMG_1513.jpg
    IMG_1513.jpg
    88.2 KB · Views: 0
  • IMG_1514.jpg
    IMG_1514.jpg
    64.5 KB · Views: 0
  • DSCF2410.jpg
    DSCF2410.jpg
    361.7 KB · Views: 0

resq302

Well-Known Member
Joined
Jul 9, 2013
Messages
280
Reaction score
5
Location
northern nj
before:

DSCF2407.jpg

after:

IMG_1515.jpg

before:

DSCF2403.jpg

after:

IMG_1516.jpg

before:

DSCF2383.jpg

after:

IMG_1517.jpg

before:

DSCF2379.jpg

after: (with correct factory colored stripe)

IMG_1518.jpg

before:

DSCF2375.jpg

after:

IMG_1519.jpg
 

Attachments

  • DSCF2407.jpg
    DSCF2407.jpg
    429.5 KB · Views: 0
  • IMG_1516.jpg
    IMG_1516.jpg
    79 KB · Views: 0
  • DSCF2403.jpg
    DSCF2403.jpg
    443.3 KB · Views: 0
  • IMG_1515.jpg
    IMG_1515.jpg
    89.4 KB · Views: 0
  • DSCF2383.jpg
    DSCF2383.jpg
    430.9 KB · Views: 0
  • IMG_1518.jpg
    IMG_1518.jpg
    47.7 KB · Views: 0
  • DSCF2379.jpg
    DSCF2379.jpg
    168.4 KB · Views: 0
  • IMG_1517.jpg
    IMG_1517.jpg
    87.6 KB · Views: 0
  • DSCF2375.jpg
    DSCF2375.jpg
    624 KB · Views: 0
  • IMG_1519.jpg
    IMG_1519.jpg
    116.7 KB · Views: 0

resq302

Well-Known Member
Joined
Jul 9, 2013
Messages
280
Reaction score
5
Location
northern nj
before:

P9280007.jpg

after: (ok...... so we added an original air grabber system.....don't hate a guy for wanting to breathe easier ! ha ha ha)

IMG_1520.jpg

before:

P9280006.jpg

after:

IMG_1521.jpg

before:

P9280003.jpg

after:

IMG_1522.jpg

before:

DSCF2397.jpg

after:

IMG_1523.jpg

before:

DSCF2396.jpg

after:

IMG_1524.jpg

before:

DSCF2395.jpg

after:

IMG_1531.jpg
 

Attachments

  • P9280007.jpg
    P9280007.jpg
    265.7 KB · Views: 0
  • P9280003.jpg
    P9280003.jpg
    237.5 KB · Views: 0
  • IMG_1521.jpg
    IMG_1521.jpg
    95.4 KB · Views: 0
  • P9280006.jpg
    P9280006.jpg
    273.9 KB · Views: 0
  • IMG_1520.jpg
    IMG_1520.jpg
    115.1 KB · Views: 0
  • DSCF2397.jpg
    DSCF2397.jpg
    231.6 KB · Views: 0
  • DSCF2396.jpg
    DSCF2396.jpg
    134.2 KB · Views: 0
  • IMG_1522.jpg
    IMG_1522.jpg
    108.3 KB · Views: 0
  • IMG_1523.jpg
    IMG_1523.jpg
    68.8 KB · Views: 0
  • DSCF2395.jpg
    DSCF2395.jpg
    192.2 KB · Views: 0
  • IMG_1531.jpg
    IMG_1531.jpg
    69.4 KB · Views: 0
  • IMG_1524.jpg
    IMG_1524.jpg
    139.5 KB · Views: 0

resq302

Well-Known Member
Joined
Jul 9, 2013
Messages
280
Reaction score
5
Location
northern nj
before:

101_0268.jpg

after: (ECS factory exact exhuast)

IMG_1527.jpg

before:

101_0267.jpg

after:

IMG_1528.jpg
 

Attachments

  • 101_0268.jpg
    101_0268.jpg
    71.9 KB · Views: 0
  • 101_0267.jpg
    101_0267.jpg
    66.5 KB · Views: 0
  • IMG_1528.jpg
    IMG_1528.jpg
    93.7 KB · Views: 0
  • IMG_1527.jpg
    IMG_1527.jpg
    84.1 KB · Views: 0

resq302

Well-Known Member
Joined
Jul 9, 2013
Messages
280
Reaction score
5
Location
northern nj
before:

101_0266.jpg

after:

IMG_1529.jpg

before:

101_0273.jpg

after:

IMG_1526.jpg

before:

101_0262.jpg

after:

IMG_1530.jpg

before:

101_0260.jpg

after:

IMG_1531.jpg

before:

102_5423.jpg

after:

IMG_1533.jpg

before:

102_5422.jpg

after:

IMG_1534.jpg

before:

102_5421.jpg

after:

IMG_1532.jpg
 

Attachments

  • 101_0266.jpg
    101_0266.jpg
    60.7 KB · Views: 0
  • IMG_1529.jpg
    IMG_1529.jpg
    63.6 KB · Views: 0
  • IMG_1526.jpg
    IMG_1526.jpg
    96.8 KB · Views: 0
  • 101_0273.jpg
    101_0273.jpg
    56.4 KB · Views: 0
  • IMG_1530.jpg
    IMG_1530.jpg
    62.2 KB · Views: 0
  • 101_0262.jpg
    101_0262.jpg
    75.5 KB · Views: 0
  • 102_5423.jpg
    102_5423.jpg
    80.7 KB · Views: 0
  • IMG_1531.jpg
    IMG_1531.jpg
    69.4 KB · Views: 0
  • 101_0260.jpg
    101_0260.jpg
    84.5 KB · Views: 0
  • IMG_1533.jpg
    IMG_1533.jpg
    59.7 KB · Views: 0
  • 102_5422.jpg
    102_5422.jpg
    92.8 KB · Views: 0
  • 102_5421.jpg
    102_5421.jpg
    84.2 KB · Views: 0
  • IMG_1534.jpg
    IMG_1534.jpg
    45.3 KB · Views: 0
  • IMG_1532.jpg
    IMG_1532.jpg
    68.6 KB · Views: 0

resq302

Well-Known Member
Joined
Jul 9, 2013
Messages
280
Reaction score
5
Location
northern nj
before:

102_5409.jpg

after:

IMG_1536.jpg

before:

102_5407.jpg

after:

IMG_1537.jpg

before:

102_5404.jpg

after:

IMG_1539.jpg

before:

102_5399.jpg

after:

IMG_1540.jpg

before: (factory installed original trunk sticker)

102_5372.jpg

after: (ECS Automotive Concepts exact factory reproduction trunk decal)

IMG_1541.jpg

before: (factory installed tire pressure decal)

102_5371.jpg

after: (ECS Automotive Concepts exact factory reproduction tire pressure decal)

IMG_1542.jpg

IMG_1555.jpg

IMG_1554.jpg

IMG_1553.jpg

IMG_1552.jpg

ECS exact reproduction exhaust system

IMG_1551.jpg

IMG_1544.jpg
 

Attachments

  • IMG_1536.jpg
    IMG_1536.jpg
    76.2 KB · Views: 0
  • 102_5409.jpg
    102_5409.jpg
    92 KB · Views: 0
  • IMG_1537.jpg
    IMG_1537.jpg
    81.6 KB · Views: 0
  • 102_5407.jpg
    102_5407.jpg
    84.7 KB · Views: 0
  • 102_5404.jpg
    102_5404.jpg
    93.9 KB · Views: 0
  • IMG_1539.jpg
    IMG_1539.jpg
    171.9 KB · Views: 0
  • 102_5399.jpg
    102_5399.jpg
    42.2 KB · Views: 0
  • IMG_1540.jpg
    IMG_1540.jpg
    83.3 KB · Views: 0
  • 102_5372.jpg
    102_5372.jpg
    51 KB · Views: 0
  • IMG_1541.jpg
    IMG_1541.jpg
    98.4 KB · Views: 0
  • 102_5371.jpg
    102_5371.jpg
    57.3 KB · Views: 0
  • IMG_1542.jpg
    IMG_1542.jpg
    70.8 KB · Views: 0
  • IMG_1555.jpg
    IMG_1555.jpg
    82.4 KB · Views: 0
  • IMG_1554.jpg
    IMG_1554.jpg
    82.4 KB · Views: 0
  • IMG_1544.jpg
    IMG_1544.jpg
    98 KB · Views: 0
  • IMG_1551.jpg
    IMG_1551.jpg
    50.5 KB · Views: 0
  • IMG_1552.jpg
    IMG_1552.jpg
    61.3 KB · Views: 0
  • IMG_1553.jpg
    IMG_1553.jpg
    118.6 KB · Views: 0

resq302

Well-Known Member
Joined
Jul 9, 2013
Messages
280
Reaction score
5
Location
northern nj
Droptop,

Neither have I. I contacted multiple well known Mopar restoration and they also have never seen something like this. If it wasn't for the fact that the car was so untouched and original, I'd swear it done by a junk yard but the date coding and part numbers on the entire assembly were all date correct and part number correct for the time the car would have been produced. The rear wheel cylinders were even the originals and the white closed cell gasket was even still in place. Fortunately, I was smart enough to document everything before I restored it so I could put it back the way it was originally.
 

resq302

Well-Known Member
Joined
Jul 9, 2013
Messages
280
Reaction score
5
Location
northern nj
Thanks Quikbird. I think Dad can now say that we are even with all the stuff that he has helped me out with....... eh, second thought.... nah. I still need to do more for him. After all..... he is my Dad ! :encouragement:
 
Back
Top